Beberapa pengguna NVIDIA melaporkan tentang menghadapi masalah ketika mereka berusaha untuk menaik taraf pemacu NVIDIA mereka di komputer mereka. Proses naik taraf tidak selesai, menyebabkan mesej ralat menyatakan - " Pemasang NVIDIA gagal ". Ini biasanya berlaku kerana pemacu lama / tidak serasi dipasang di komputer pengguna. Sekiranya anda menghadapi masalah yang sama, jangan risau. Cukup perbaiki masalah ini pada peranti anda dan masalahnya akan dapat diselesaikan dalam masa yang singkat. Tetapi sebelum menyelesaikannya, cubalah penyelesaian awal ini dan periksa sama ada ia menyelesaikan masalah anda-
Penyelesaian Awal -
1. Nyalakan semula komputer anda. Sekarang, cuba kemas kini pemacu NVIDIA sekali lagi dan periksa sama ada masalahnya masih berlanjutan atau tidak.
2. Buat sementara waktu, matikan antivirus dan firewall pada sistem anda. Sekarang cuba mengemas kini pemacu sekali lagi.
Sekiranya anda masih menghadapi mesej ralat, cari pembaikan ini-
Betulkan-1 Tamatkan proses NVIDIA dan padamkan folder NVIDIA-
1. Tekan Ctrl + Shift + Enter untuk membuka Pengurus Tugas .
2. Sekarang, di tab " Proses " dan tatal ke bawah dan anda akan melihat proses NVIDIA (seperti - proses "NVIDIA Container") berjalan di sistem anda.
3. Klik kanan pada setiap proses dan klik pada " End Task " untuk menghentikan semua proses ini.
Anda semestinya melihat proses ini berjalan di sistem anda-
NVIDIA Backend (32 bit) NVIDIA Driver Helper Service NVIDIA Network service (32 bit) NVIDIA Tetapan NVIDIA Pengalaman Pengguna Komponen Pemandu

4. Buka tetingkap File Explorer , dan pergi ke lokasi ini pada cakera keras anda-
C: \ Windows \ System32 \ DriverStore \ FileRepository \
Tatal ke bawah dalam folder dan mencari folder yang mempunyai di bawah item yang diberikan atas nama dan memadam mereka-
nvdsp.inf
nv_lh
nvoklok

4. Kemudian, dalam File Explorer, mengemudi ke folder ini dan mengosongkan mereka-
C: \ Program Files \ NVIDIA Corporation \
C: \ Program Files (x86) \ NVIDIA Corporation \

5. Nyalakan semula komputer anda dan selepas reboot ikuti Fix-6 untuk memasang pemacu NVIDIA secara manual pada komputer anda.
Betulkan 2 - Menggunakan Prompt arahan
1. Buka command prompt sebagai pentadbir.
2. Jalankan arahan yang diberikan di bawah satu demi satu di tetingkap cmd.
bcdedit -set loadoptions DISABLE_INTEGRITY_CHECKS bcdedit -set TESTSIGNING ON
3. Sekarang, mulakan semula komputer anda dan cuba lagi. Masalah anda akan selesai.
4. Setelah itu, Buka command prompt sebagai admin sekali lagi dan jalankan arahan yang diberikan di bawah ini untuk membuat sesuatu seperti sebelumnya.
bcdedit -set loadoptions ENABLE_INTEGRITY_CHECKS bcdedit -set TESTSIGNING OFF
Fix-4 Kemas kini pemacu NVIDIA dari Device Manager-
1. Setelah menekan ' Windows key + X ' dari papan kekunci anda, klik pada " Device Manager ".
Utiliti Pengurus Peranti akan dibuka.

2. Setelah tetingkap Pengurus Peranti muncul, cari bahagian " Adaptor paparan ".
3. Sekarang, dari drop-down klik kanan pada pemacu grafik yang anda gunakan. Kemudian, klik " Kemas kini pemacu ".

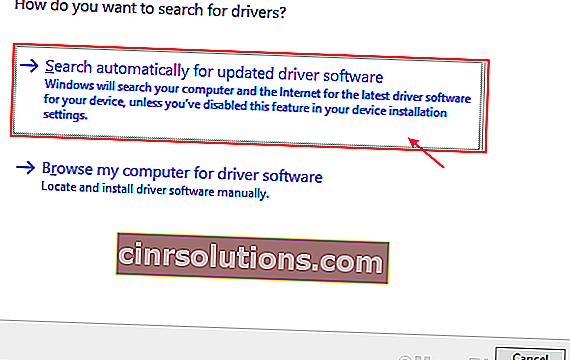
3. Di tetingkap berikutnya, pilih pilihan yang menyatakan, " Cari secara automatik untuk perisian pemandu yang dikemas kini ".
Setelah proses kemas kini selesai, tutup tetingkap Pengurus Peranti .
Nyalakan semula komputer anda.
Betulkan-3 Pasang pemacu NVIDIA secara manual-
1. Pada mulanya, lancarkan Google Chrome.
2. Kemudian, cari " Pemacu Nvidia "
3. Selepas itu, anda perlu mengklik " Muat Turun Pemacu | NVIDIA ".

4. . Now, in this window, under ‘NVIDIA Driver downloads’ section choose “Product type“, “Product series“, “Product“, “Operating System“, “Windows Driver Type“, “Download Type” according to your driver specifications.
5. Once you have selected your product, click on the “Search“.

6. Then, click on “Download” to download the driver.

Close the browser.
7. Locate the downloaded application on your disk.
8. Then, double click on it to start the installation process of the driver.

9. Now, in the NVIDIA Graphics Driver window, click on “NVIDIA Graphics Driver and GeForce Experience” and click on “Agree and continue“.

10. Under Installation Options, choose “Express (Recommended)” and click on “Next” to start the installation process.

11. After installation is done, click on “Close” to close the NVIDIA Graphics Driver Installer window.

Restart your computer to finish the installation process.
If you are still facing the problem during the installation, perhaps performing a clean installation of the NVIDIA driver can help you out.
Fix-4 Perform a Clean install
[NOTE– Performing a clean installation will clear any kind of custom settings of the driver on your device. But it will remove any further errors in the NVIDIA installer from your device.]
The NVDIA installer you downloaded during the manual installation (i.e. the Fix-6)will be used in this fix.
1. Go to the location where the installer is located on your computer.
2. When you are in that location, double click on the installer to start the installation.
3. In the NVIDIA Installer window, choose the option “NVIDIA Graphics Driver and GeForce Experience“.
4. Then, click on “Agree and continue“.
5. Now, choose “Custom installation“.
6. Click on “Next” to start the installation process.

7. Now, checkthe “Perform a clean installation” option.
8. Finally, click lick on “Next“.

After installation is done, click on “Close” to close the NVIDIA Graphics Driver Installer window.
Restart your computer to finish the installation process.
You should not face any further issues with the installation of the NVIDIA driver.
Fix-5 Use Display Driver Uninstaller-
1. Download the DDU.zip on your device and after downloading it, unzip the folder in a favorable location of your choice.

2. Now, press Windows Key+R to launch Run, and “control printers” and hit Enter to open Device and Printers window in Control Panel.

3. Now, right-click on your computer name and then click on “Device installation settings“.

4. Now, choose “No (your device might not work as“ expected) and click on “Save Changes“.

Close the Devices and Printers window.
5. Then, google “Nvidia drivers” from your browser and click on “Download Drivers|NVIDIA“.
6. Now, in this window, under ‘NVIDIA Driver downloads’ section choose “Product type“, “Product series“, “Product“, “Operating System“, “Windows Driver Type“, “Download Type” according to your driver specifications.
Once you have chosen the right driver for you computer, click on the “Search“.
7. Click on “Download” to start the downloading process.
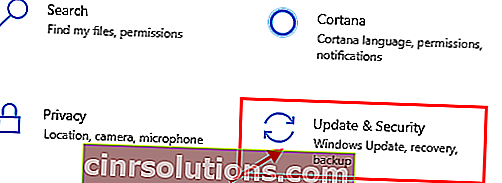
8. Press Windows Icon+I to open Settings application, now click on “Update and Security“.
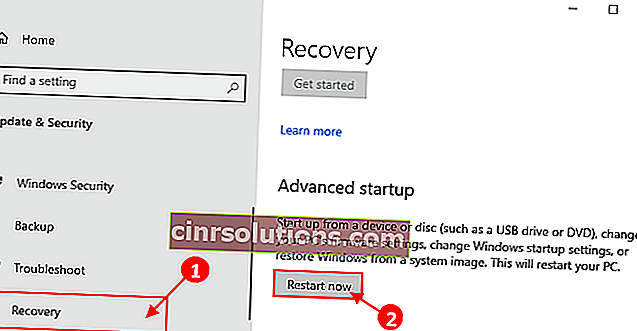
9. Now, on the left pane, click on “Recovery“,
Then, on the right-hand side of the screen, click on “Restart Now” under Advanced Startup.
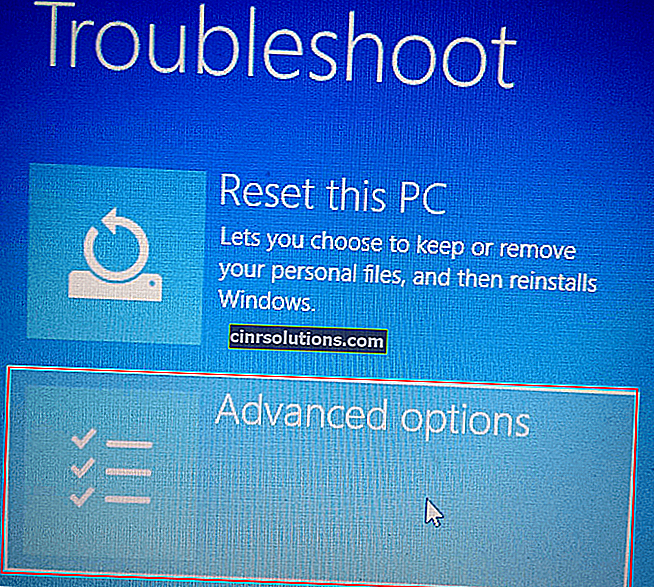
10. Then click on “Advanced options“.
11. Now, within the Advanced options window, click on the “Startup Settings“.

12. Then, click on “Restart”.

13. Now, just press 4 from your keyborad to “Enable Safe Mode“.

In Safe mode, the background of your desktop will be black.
14. Now, navigate to the file location where you have extracted DDU.zip. Double click on “DDU v18.1.0.9” to extract the main files.
Go to the extracted folder, and double click on the “Display Driver Installer” to run it on your device.

15. Now, in the Display Driver Uninstaller window, on the left-hand side, click on the drop-down beside “Select device type” and click “GPU” and finally click on “Clean and Restart“.

16. This will uninstall the NVIDIA driver from your system and you will be booted to normal mode again.
17. Now, you have to boot into safe mode again ( follow the instructions in Step-8 to Step-13 of this fix).
18. After booting into safe mode, locate the downloaded application on your disk.
19. Now, double click on it to start the installation process of the driver.
20. Once the installation process has finished, click on “Close” to close the NVIDIA Graphics Driver Installer window.
Restart your computer to finish the installation process.
21. After rebooting, press Windows Key+R and write “control printers“.
22. Click on “OK“.
24. Now, right-click on your computer name and then click on “Device installation settings“.
25. Now, choose “Yes (recommended)” and click on “Save Changes“.

You should not face any further issues with the installation of the NVIDIA driver.
Fix-6 Perform Clean Boot-
1. To open the Run terminal on your desktop, press Windows key+R.
2. Then, type “msconfig” and after that, click on “OK“.

3. After that go to the “General” tab
4. In the General tab, uncheck the box beside the “Load startup items“.
5. Finally, you have to make sure the “Load system services” is checked.

6. Now, click on the “Services” tab.
7. Click once beside the option “Hide all Microsoft services” to check it.
8. To disable all these services, click on the “Disable all“.
9. Now, click on “Apply” and “OK“.

Reboot your computer, it will be booted in clean mode.
Fix-7 Rollback the existing display adapter-
1. At first, right-click on the Windows icon and then click on the “Device Manager“.
Device Manager utility will open.
2. In the Device Manager window, find “Display adapters” from the list, click on it to expand it.
3. Now, from the drop-down double click on the NVIDIA graphics driver, you are using. The properties window will open.

3. Di tetingkap Properties , pergi ke tab " Driver ". Klik pada " Roll Back Driver ". Klik " OK". Ini akan mengembalikan kemas kini pemacu grafik NVIDIA anda yang lebih lama dan akan diganti dengan versi pemacu anda yang lebih lama.

4. Sekarang, ketika pertanyaan “ Mengapa bergulir kembali? "Muncul, pilih" Aplikasi saya tidak berfungsi dengan pemacu ini ".
5. Sekarang, klik " Ya " untuk memulakan proses memutar balik.

Tutup tetingkap Pengurus Peranti .
Nyalakan semula komputer anda. Selepas reboot, anda seharusnya dapat mengemas kini pemacu tanpa sebarang kesalahan.